Note: Even though I originally wrote this for WordPress v2.3, it continues to work for all versions of WordPress through v2.9.x.
Background
Who knew that when I migrated my Blogger blog to WordPress way back when, I’d still be supporting a hacked together Haloscan importer 3 years later!
Awhile back, I don’t remember if it was during WordPress 2.2 or 2.3, the folks at Google revamped Blogger, which meant the old Blogger importer no longer worked. So the heroic coders that do the heavy lifting for WordPress set out to write the-Blogger-importer-to-end-all-Blogger-importers, this time using Blogger’s feed-based “API”.
The problem for you classic Blogger folk with Haloscan comments is that the only way to link your Haloscan comments to their post is via Blogger’s postID. Which is apparently not accessible in the feed API. Grrr. Which meant my previous hack for associating the postID with the newly imported WordPress post no longer worked.
Last night, I finally went back to the drawing board and came up with a new solution. I’ve tested it successfully on two different blogs.
…or how to “Justinify” your photos …or how I learned Lisp on a Saturday night
Yesterday I was working on a project where I needed to resize and “retouch” over a hundred photos for the web.
I tried playing with ImageMagick’s command line mogrify tool, but I wasn’t too pleased with the results—that and there’s something inherently tedious about making visual transformations from the command line. I performed the same operations in GIMP to compare, and it looked much better.
So I was confronting the idea that I’d have to manually edit all 100+ photos when I finally decided to buckle down and learn how to script GIMP.
GIMP uses Scheme (of all things) as its scripting language; Scheme being one of the two popular modern dialects of Lisp; Lisp being the holy grail of high-level programming languages (and the second oldest, after Fortran). So little did I realize, scripting GIMP was going to force me to learn Lisp…
I have to admit I’ve thought for a long time it’d be great to have a tool that brought together all of the settings I usually tweak when I’m editing a photo (color balance for brightness, contrast, saturation, and sharpening) because in GIMP they’re located deep in three different submenus. But doing one photo at a time was never motivation enough to dig under the hood. The thought of retouching 100+ photos, however, was the anvil that broke the camel’s back.
I learn best by looking at very simple but functional examples, so I started scouring the web to see what other people were doing, eventually landing on Dov Grobgeld’s Basic Scheme tutorial at gimp.org. It goes from how to add numbers in Scheme to creating your first extension in less time than it’s probably taken you to read this far. David M. MacMillan’s Some GIMP Scripts-Fu was also a great resource.
I have to say the best thing about GIMP’s extensions is that they enable the creation of rudimentary user interfaces for inputting configurable parameters. So I wasn’t limited to just my standard defaults for contrast and saturation—I could actually “build” an interface with tweakable values. Hot!
Around 3am last night, I finally put all the pieces together. Here’s what the Web Photo Editor looks like:
Update: it was announced on May 13, 2008 that a vulnerability was discovered in a Debian patch to a library used to generate SSH (and SSL) keys. If you followed these instructions before May 15, 2008 to generate a passphraseless key, you’ll need to update your system. All you need to do is goto System > Administration > Update Manager and click “Install Updates” from the GUI (or sudo apt-get update && sudo apt-get dist-upgrade at the command line). If you don’t know what I’m talking about, you’re probably not affected.
Right after I wrote How to regularly backup Windows XP to Ubuntu, using rsync for my T42 ThinkPad, I ended up installing Ubuntu on it. In the end I was mostly interested in backing it up for the purpose of safely wiping Windows. So much for regularly.
Then something unexpected happened: I started to use my 5 year old X23 exclusively. Partly because I’d already gotten comfortable with Ubuntu on it, and partly because I was using it at the time to edit photos on the bus ride home from work. When I got home, it didn’t make sense to switch to another laptop to finish whatever I was working on.
It also may have something to do with a feeling that I think Mark Pilgrim put well:
So I’ve been meaning to get back to rsync to start regularly backing up Ubuntu to Ubuntu. Well my little Mini-ITX server with external hard drive is already up and running. So that half of the equation was in place. What I was a little rusty on was how to set the whole thing up to run without needing a password.
That turns out to be really easy. If you’ve got ssh, then you’ve probably got ssh-keygen, which exists for the sole purpose of generating public and private keys, which when created without a passphrase can be used for password-free logins. So I ran ssh-keygen to generate a 2048 bit RSA key without a passphrase (aka a passphraseless key). I could also have generated a 1024 bit DSA key. I’m not sure I understand the difference. I’m not sure it matters.
ssh-keygen -b 2048
Inside ~/.ssh, ssh-keygen created two standard files, id_rsa and id_rsa.pub, the private and public keys respectively. The next and final step is to copy and “install” the public key on my backup server (192.168.0.100).
ssh-copy-id uses ssh to copy the public key to the remote server and appends it to the ~/.ssh/authorized_keys file. Of course I didn’t know about ssh-copy-id when I started, so I just scp-ed the file over and pasted the public key into the authorized_keys file.
At which point I could use ssh to login without a password! ssh knows to automatically check for the existence of the id_rsa private key and try logging in with that.
ssh 192.168.0.100
Hot damn! That alone makes me want to start distributing my public key around to every server I access regularly. Of course the other benefit (and the whole point of this post!) is that now I’ll also be able to cron an rsync backup without requiring a password.
My ideal backup is a relatively current mirror of my home directory. I’m not looking for modified file snapshots or entire bootable filesystem images, I just want to know that if my hard drive crashes, most of my data (especially the photos) is recoverable. To that end, my rsync needs are relatively simple, though it took some tweaking to get to this point:
The -a option means archive files—it’s really an alias for a lot of other options having to do with maintaining permissions and timestamps, etc. The -z option uses compression when transferring files. The -e ssh option tunnels the file transfer over an encrypted ssh connection. The --delete option deletes any destination files that have been deleted from the source. The --exclude=".*/" option skips hidden files and directories. Finally the last two parts are the source (in this case everything under my home directory) and the destination I’ve already set up on my backup server.
And that’s it. I added it to my cron to run daily at 10pm. Set and forget it.
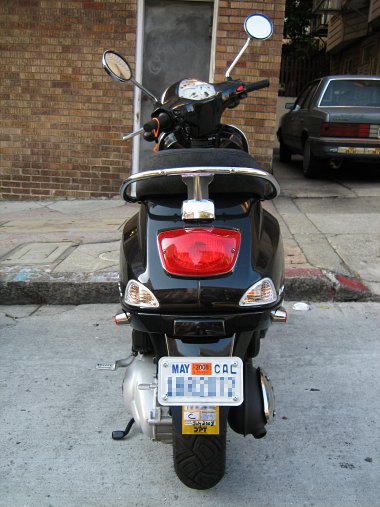
I think I may have found a solution to my pressing aesthetic dilemma: where to put a residential parking permit sticker on a Vespa?
It’s called an inspection plate—useful in states (unlike California) that require an annual inspection sticker displayed on your vehicle. Or in my case, a parking permit. There are several varieties and locations for mounting the plate on motorcycles, but I think this one looks the best on scooters:
I ordered it this morning from J&P Cycles for only $2.99—of course shipping and handling brought the total to just over $11 and they wouldn’t let me ship it to my work address, but whatever.
Will post photos when it arrives.
Update (September 10, 2007): Woo-hoo, it arrived, just as I expected. No more living in fear of the man. Immediately broke out the toolbox and installed it between the license plate mount and the license plate.
Good news is, the thing is diminutive. A half inch of the sticker is hiding under the plate—the self-obvious part that says “Motorcycle Parking Permit.” But it also meant I couldn’t use the license plate frame that Vespa SF so kindly put on my bike after having it serviced. Guess it’s time to order another accessory.
I’ve never really been one to squabble over my bank’s interest rates. Historically I haven’t saved that much, and the interest I’ve earned on what I have saved has always amounted to such a pittance (~$10 or $20 per year), that I decided it wasn’t worth my time to relearn those formulas from Algebra I.
Recently though I sold my car, which netted a healthy chuck of change. Some of which I used to buy our scooters, and the rest I put in a money market savings account I opened at Wells Fargo (my bank). In the month between selling the car and buying the scooters I got the largest interest payment I’d ever seen, something like $16. I was livin’ large. But after that, I’ve been getting like $2 and change a month. So out of curiosity I decided to find out why.
My checking account at Wells Fargo pays no interest. This is pretty much par for the course. My savings account only pays 0.5% interest per year. That means if I have $1000 squirreled away, by the end of the year I’ll have $1005. Considering inflation hovers between 2 and 3%, my savings account is losing me money.
When I had over $10,000 in my Wells Fargo money market account (after selling my car), my interest rate was a whopping 1.54%, hence the “big” payout. But after purchasing the scooters and dropping below 10k, my graduated interest rate dropped too, to a measly 0.75%.
Now somewhere, someplace I got the idea that a good savings account should return between 4 and 5% interest, a long term CD between 5 and 6%, and a diversified stock market portfolio between 7 and 8% (over the long term). So I’m not sure why I’m suffering sub 1% interest rates at Wells Fargo.
Truth be told, the real reason I decided to look into all this was that I was checking on my IRA at Schwab when I saw them advertising an FDIC insured checking account with no minimum balance and an APY of 4.25%!
That itself wasn’t what caught my eye, because at the time I didn’t have a clue what sort of interest rates my Wells Fargo accounts had. What did strike me was this: “Zero ATM fees. We’ll automatically reimburse any ATM fees you’re charged.” Which for me would translate to no more hunting around for Wells Fargo ATMs, and no more worrying about stupid $2-3 per withdrawal ATM fees every time I need a twenty. That’s huge.
What’s the catch? You have to open it with a Schwab One Brokerage Account—basically their umbrella investment account for trading stocks, bonds, and mutual funds. My IRAs don’t count—they’re different. But I’d already been toying with the idea that it might be useful at some point to throw some money at the stock market. So this seems like a really good deal. After discovering how much my current savings accounts at Wells Fargo suck, it’s starting to look like an amazing deal.