In the background, I’ve been making a few improvements to my blog, some of which I think are pretty cool.
The Elastic Homepage
The first was inspired by my rampant blogging over the holidays, partly trying to keep in contact with friends and the fam, but also because I was spending an inordinate amount of time trying to get from Phoenix to Austin. Plus PHX had FREE! and ubiquitous wireless, so what else was a blogger to do?
I also noticed, as expected, that the traffic to my blog dropped off precipitously during the holidays. So there I was, posting once or twice as day, and with only 5 posts showing up the homepage, I was concerned that when people took a break from celebrating with their families to check their email and my blog, half of my ordeal might have scrolled off into the archives!
It occured to me that I needed to whip up some hybrid between Movable Type’s default behavior of showing the last X days worth of posts and just about every other platform’s behavior of displaying the last N posts. I could manually expand the number of posts showing up on my homepage, but I thought it’d be a LOT cooler if the homepage automatically “stretched” so that it displayed more posts when I’m posting frequently, but never dropped below some minimum threshold when I can barely squeeze out a post a week.
So that’s what I’ve done. At minimum you’ll see the last five posts on the homepage, but if I happen upon a stroke of unexpected brilliance, you’ll see at most the last 8 days worth of posts. Which, if you check my blog once a week (the old fashioned way), means you won’t miss a thing. Ha!
Update: The Elastic Homepage Howto
Want to implement the Elastic Homepage yourself? It’s based on Justin Blanton’s Limit number of posts with WordPress, so first you’ll have to set the Show at most posts option under Options > Reading to some large number. Choose something that you wouldn’t expect to exceed in the maximum time period you specify below. Be aware that this will affect how many posts show up in your archive, category, and search result pages. The updated code below will then override this number based on variables you specify.
In your index.php template file, change the following code (as taken from the default template):
<?php if (have_posts()) : ?>

    <?php while (have_posts()) : the_post(); ?>
To this:
<?php if (have_posts()) :

    // variables to configure elastic homepage
    $minimum_posts_to_display = 5;
    $maximum_days_to_display  = 8;

    // initialize counter for elastic homepage
    $elastic_homepage_counter = 0;

    // convert days to seconds (60*60*24 = 86400)
    $maximum_days_to_display *= 86400;
?>

    <?php while (have_posts()) : the_post();

        // stop printing posts when the minimum number of posts has been reached
        // and the current post is older than the number of days specified above
        $age_of_current_post = time() - get_the_time('U');
        if (($elastic_homepage_counter >= $minimum_posts_to_display) &&
            ($age_of_current_post      >  $maximum_days_to_display))
        {
            break;
        }
        $elastic_homepage_counter++;
    ?>
Then modify the variables $minimum_posts_to_display and $maximum_days_to_display to configure the elasticity of the homepage to your liking.
Hidden Comments
The next idea came to me while I was reading a recent comment on my monthchunks plugin post, which continues to generate interest and thus occasionally new comments. The utility of scrolling down a narrow column of 40 odd comments loses its allure pretty quickly. Wouldn’t it be cool, I thought, if I could hide the old comments without making them inaccessible, in order to bring the most recent to the top, while still sorting them in chronological order.
With a teensy bit of JavaScript and a little WordPress theme hacking, I wrapped the first bunch of comments in a div so that only the most recent 10 comments lived outside of this div. Then I set display:none on the div so it doesn’t show up, but I added a link at the top of the comments that says Show comments: 1 through X which makes the div reappear and hides the link. Ah, so satisifying.
I came back a day or two later and realized that clicking the link to show the hidden comments happens so fast that it’s hard to tell what exactly changed. What a perfect opportunity to try the Yellow Fade Technique, popularized by the folks at 37Signals. [Unfortunately the images on the YFT post are currently broken, so it doesn’t do you much good.] However, the gist is that if you change something subtly on a webpage, you should provide the user with some kind of visual cue that something happened, like fading the updated info from yellow to white.
Perfect! All I needed was a library that would fade from any color to any background color. Thank you Adam Michela for doing the heavy lifting so I didn’t have to. His Fade Anything Technique does exactly that. I grabbed the code, plugged in my purplish highlight color and my beige background color, so now when you click the link to show the hidden comments, they gradually fade from purple to beige. SO COOL!
Check out Television Abstinence (currently has 12 comments, so 2 are hidden) to see this in action.
The latest version is 5.0, released June 20, 2008, now with support for WordPress 2.5 galleries, and still backwards compatible with 2.3, 2.2, 2.1, and 1.5
Inspiration
One of the things I’ve been thinking about more since starting at O’Reilly is how to draw attention to a back catalog of content. For a single blogger, it’s pretty easy to link back to a relevant old post because of the information retrieval processor built into our heads. But for a site managed by an editor who may not be as familiar with the back catalog, the older content will languish, accessible only by search engines.
Then the other day I discovered the most amazing thing. I was freshening up the layout of O’Reilly’s Mac DevCenter, and we decided it would be cool to have a randomly populated book sidebar. Which meant I needed to pull records out of our database in random order—not something I’d ever needed to do before. It turns out that the SQL needed to do this is astoundingly simple:
SELECT *
FROM table
ORDER BY RAND();
Maybe you only want a single random record? Easy.
SELECT *
FROM table
ORDER BY RAND()
LIMIT 1;
Seeing this in action for the first time is like a revelation.
What does this plugin do?
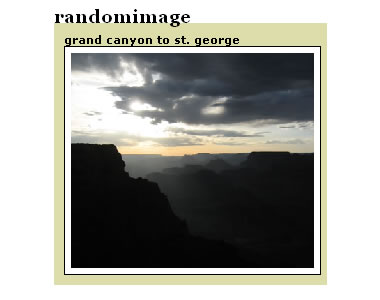
Since I started blogging, I’ve added 500+ images to my blog posts, and I’ve always wanted some way to index them, or make them accessible in aggregate. I wrote a script once that generated a webpage to display all the images, but I had no means (at the time) to link them back to their associated blog posts.
Of course since I moved to WordPress, I have complete control over my content, so I decided to write a plugin to look for blog posts with images and return one image at random, linking back to its post. Update: If you prefer, you can now configure this plugin to display images in reverse chronological order (most recent to least recent) rather than in random order.
You can see it in action in the upper-righthand corner of my homepage. Here’s a screenshot:
What doesn’t this plugin do?
This plugin does not rotate randomly through a group of images stored in a single directory on your webserver. If you are looking for a plugin to do that, try Matt Mullenweg’s A Rotater Apartor Kamiel Martinet’s WordPress random header plugin or MHough’s Header Image Rotator.
This plugin does not natively resize images (you can use the CSS on the optional image attribute parameter to resize the image in the browser). Which means it does not create thumbnails, create square thumbnail images, nor have any knowledge of how or where your WordPress-generated thumbnail images are stored. It simply looks for a random image that you’ve embedded in the content of your post (or gallery) and returns it. This ensures that it always correctly returns an image that actually exists.
Upload the file randomimage-standalone.php to your plugins directory (alongside randomimage.php):
/path/to/wordpress/wp-content/plugins
Note: This is not a separate plugin, it’s simply a supporting file for randomimage.php, therefore there is nothing you need to activate or configure.
On the other blog (or any website, really) where you want the random image to appear, insert the following HTML snippet, replacing example.com/wordpress with the domain name (and directory, if any) where randomimage-standalone.php lives
Note: for the random image to be appear, JavaScript much be enabled in the browser.
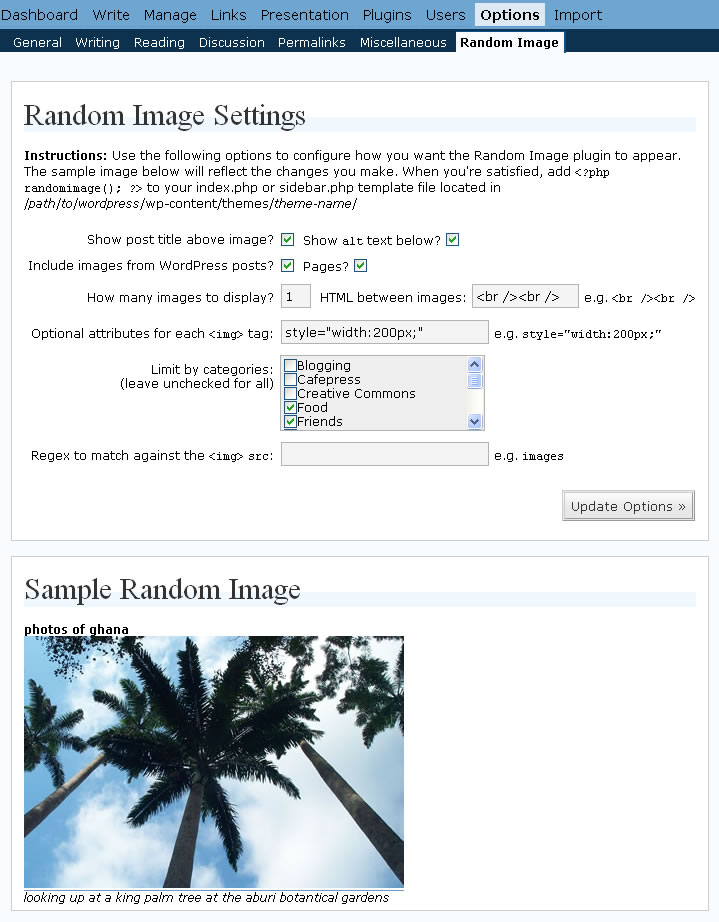
Options
The randomimage function can take 12 optional parameters in between the parentheses. If you specify any parameters this way, all settings made through the configuration interface (shown above) will be ignored. Note: this behavior could be useful if you wanted to have several different random images each with different settings appearing throughout your site.
show_post_title is a boolean (true or false) that determines whether the title of the original blog post is printed above the image. The default is true.
number_of_images is an integer that determines how many random images the function should return. The default is 1.
image_attributes is a string that gets inserted in the img tag which you can use to set attributes like a standard width or a title (tooltip). The default is an empty string. For example, "width='200'" would reduce the size of the image to be 200 pixels wide (and proportionally high).
show_alt_caption is a boolean (true or false) that determines whether the alt attribute (if there is one) is printed below the image. The default is true. (new in v1.2)
image_src_regex is a string containing a regular expression (without slashes) that matches against the image src attribute. For example, if you only wanted to display jpg’s and png’s, you would use "(\.jpg|\.jpeg|\.png)". If you only wanted to display images from a specific directory called images, you could use "images". This parameter uses the preg_match php function in case-insensitive mode. For more information on constructing regular expressions, check out regular-expressions.info. (new in v1.2)
post_type is a string that allows the following three values: posts for including images from post content only, pages for including images from page content only, and both for including images from posts and pages. The default is posts only. (new in v1.3)
inter_post_html is a string (presumably HTML) that is outputted between subsequent images if number_of_images is greater than 1. The default is <br /><br />. (new in v1.4)
category_filter is a comma-separated value string of numerical category IDs that will limit the plugin to grabbing images from posts assigned to only those categories. The category IDs can be determined by going to Manage > Categories. The default is an empty string which will allow images from posts assigned to any category. (new in v2.1) Even though the name hasn’t changed, this option now includes tags too! (new in v4.1)
sort_images_randomly is a boolean (true or false) that determines whether the image (or images) pulled from the database are displayed randomly or in reverse chronological order. By setting this option to false, the plugin effectively displays recent images, rather than random images. The default is true. (new in v3.0)
image_class_match is a string that you can use to specify a classname that the randomly chosen image’s class attribute must contain. So if you set it to randomimage, only images with class="randomimage" (or even class="left randomimage") will be displayed. (new in v4.0)
image_template_html is a string that acts as a template for displaying the image. With it you can create wrapper HTML around the image, or position the caption on top, or a myriad other things this plugin author hasn’t conceived. Use %1 in the template to represent the title, %2 to represent the image, %3 to represent the caption, and %4 to represent the post excerpt. By default, the template is:
<strong>%1</strong><br />
%2<br />
<em>%3</em>
Note: If image_template_html is specified, it overrides show_post_title and show_alt_caption. (new in v4.0)
show_images_in_galleries is a boolean (true or false) that determines whether the plugin should show images from WordPress 2.5’s new gallery feature. The default is true. (new in v5.0)
If you wanted to use all the options together, you might add the following to your index.php or sidebar.php file:
Suppress printing caption if it’s the same as the image filename
Check image dimensions to prevent enlarging small images (?)
Add option to only display images within a certain width/height range
Add a check to make sure image exists
Optionally create a thumbnail of configurable dimensions (hard)
Store post image info in the postmeta table (hard)
Questions, comments, and suggestions are always welcome. If you’re interested in contributing to the code behind the Random Image plugin, it’s hosted on GitHub.
Scenario: as your webmail login interface is loading, you’ve already selected your username—thanks to Firefox’s form autocompletion—but at the instant you tab over to the password field, the page finishes loading, some javascript onload event fires, and the page focuses the caret back in the username field.
Of course you’re not even looking at the screen because you do this so often, and before you realize it, you’ve hit enter and sent your username and your password together in the username field, which Firefox has just cached for all of eternity. Now the next time you go log in, Firefox’s autocompletion options exposes your password. Argh!
Solution: This shouldn’t be a big deal to fix, except the only UI option for clearing out a saved form value (that I can determine) is by going to Tools > Options > Privacy > Saved Form Information and selecting “Clear”. So it appeared to be an all or nothing proposition.
Well at least until I talked with Asa Dotzler at FOO Camp on Sunday. After a really nice long conversation, I thought to ask about why I couldn’t selectively remove saved form values and he said:
Update, please read this first!
The instructions below only worked for WordPress 1.5, 2.0, 2.1, and 2.2 before Google released a new version of Blogger—which broke the WordPress importer. Since that time, these instructions have ceased to be useful. However, if you’ve recently imported your Blogger blog into WordPress 2.3 (or are planning to) and need to import your Haloscan comments, check out my new post created specifically for you: Importing Haloscan comments into WordPress 2.3 from Blogger. I’m leaving this post here for posterity, but since it’s no longer doing anybody any good, I’ve closed the comments.
Background
Judging by the response to my original moving from blogger to wordpress post, this is a popular topic. However, I only meant for that post to be useful to the next hacker down the line and not so much for the faint of heart. This post seeks to remedy that oversight with an improved script for importing Haloscan comments into WordPress.
This was made possible after Haloscan fixed their comment export feature so that html is no longer stripped from the comment text. The other night I looked back at some code I had pieced together based on Phil Ringnalda’s code from his post, Importing YACCS comments in Movable Type, and I was able to finish the Haloscan importer the way I had originally intended: without screen scraping! If you have any problems or suggestions, feel free to leave a comment. Enjoy.
Step 1: Upgrade Haloscan
Only “premium” customers have access to Haloscan’s export comments feature. Bah! The only way to get around this limitation and get access to your comments for export is by donating $12 to Haloscan. If you do make the donation, the instructions and code below (for versions 1.5.x and 2.x of WordPress) should work for you.
Step 2: Import Blogger posts into WordPress 2.x
If you’ve already imported your Blogger posts using WordPress 2’s importer without the modification below, you will need to delete the posts you’ve imported, make the modification described in step 2, and rerun the importer. Luckily I’ve created a plugin to make deleting all of your blog posts a snap.
Open /path/to/wordpress/wp-admin/import/blogger.php in a text editor
Explanation: This stores each blogger post id as an html comment at the beginning of the post, which is used later to associate the post with the appropriate Haloscan comments.
Save the file and then return to a web broswer
Log in to the WordPress administrative interface and select the “Import” option from the top menu, and then select “Blogger” and follow the instuctions for importing your posts
Continue with Step 3: Importing your Haloscan comments below
Update: If you’re interested in maintaining the permalinks to your posts, I’ve written a post called Maintain permalinks moving from Blogger to WordPress that requires three additional changes to the blogger.php script, which need to be made before you run the import. (17-Oct-2006)
Step 2B: Import Blogger posts into WordPress 1.5.x
Note: This step is left here for historical purposes. WordPress 2 comes with a significantly more advanced importer for Blogger which should be used instead of the instructions below. If you’re importing into WordPress 2.x, skip to Step 3.
The instructions marked with an asterisk (*) below are slightly different from the instructions that come with the import-blogger.php script provided by WordPress. In particular, step 7 is crucial in order to import comments from Haloscan.
If you’ve already imported your Blogger posts into WordPress using the provided import-blogger.php script and you can’t or don’t want to delete the posts that you’ve already imported, I’ve written a script to insert the Blogger post IDs into your WordPress posts so that you’ll be able to successfully import your Haloscan comments.
Just download insert-blogger-post-ids.zip, unzip it, and upload insert-blogger-post-ids.php to your wp-admin directory. Then run it in your browser like you did import-blogger.php. Now you can skip down to the section entitled “Importing your Haloscan comments”.
log in to Blogger
go to Settings > Publishing and set FTP Path to your WordPress install e. g. /path/to/wordpress/
*change Blog Filename to wordpress.html explanation: prevents creating an index.html file in wordpress directory—this file can be deleted later
go to Settings > Formatting and change Timestamp Format to mm/dd/yyy hh:mm:ss tt (the first option) and set Enable float alignment to “No” explanation: the second change prevents Blogger from inserting unnecessary formatting markup at the beginning and end of each post
go to Settings > Archiving and set Archive Frequency to “Monthly”, set Archive File name to wordpress.php, and set Archive Path to your WordPress install e. g. /path/to/wordpress/ (should be the same as above)
*set Enable Post Pages to “No” explanation: prevents creating post pages filed under directories named 2004, 2005, etc in your WordPress directory which would eventually collide with permalink rewrites
*go to Template > Edit Current and replace your template with the following line of code
explanation: includes the unique blogger post id within an HTML comment in the body of each post
Click “Save Template Changes” and then click “Republish” to republish your blog
goto http://example.com/wordpress/wp-admin/import-blogger.php where example.com/wordpress is replaced with the domain name and path to your WordPress install
click OK at the bottom of the page to import your Blogger posts
Step 3: Importing your Haloscan comments
import-haloscan.php has be revised for WordPress 2.x so that comment counts are now automatically incremented.
Upload import-haloscan.php to your wp-admin directory /path/to/wordpress/wp-admin/
log in to Haloscan
go to Manage Comments > Export Note: only “premium members” have access to export their comments, but if you’re really serious about leaving Haloscan, you might be willing to donate the $12 necessary to gain access to your comments for exporting.
There will be an export link for every thousand comments you have. Clicking one of the export links will prompt you to save the file as “export.xml”. If there is more than one link (i.e. if you have more than 1000 comments), rename the first file to export1.xml, the second file to export2.xml, and so on. Save the files to your desktop and upload them to your WordPress directory /path/to/wordpress/
Go to http://example.com/wordpress/wp-admin/import-haloscan.php where example.com/wordpress is replaced with the domain name and path to your WordPress install
Click OK at the bottom of the page to import your Haloscan comments
unfortunately this took me a long time to get around to. i got the following request in response to my monthchunks for wordpress post:
So is there any way that someone still on Blogger (waves hand in the air with earnest and pleading look on face) could wangle the original javascript to turn the ‘standard archive link into something a little more compact’? I assume this would be code that goes into my custom template in place of the month-by-month links I’ve got there now? Short of a real calendar, the less vertical space used up by my archive links list, the happier a camper I am. Many thanks, I hope! —Leeeny
i developed the monthchunks archive format originally in javascript to modify the display of the links to my blogger archive pages. but since i moved my blog over to wordpress and replaced the javascript with a plugin written in php, i thought the javascript was gone.
of course it completely skipped my mind that my neatlinks sidebar blog is blogger driven, and the monthchunks-style archive links at the bottom of the column are indeed generated by javascript on the client. here’s how to do it.
get the javascript monthchunks-1.0.js into your blog in one of two ways:
if you have the ability to upload files to your web host, grab the the monthchunks javascript above and upload it to your web directory (i put my javascript files in a folder called “scripts”), then add the following line of code before the </head> tag at the top of your current blogger template
note: the src attribute assumes the script lives inside a folder called “scripts”—if this is not the case, change it appropriately
if you cannot upload the javascript file to your web host (for instance if you’re using blogspot), add the following lines of code before the </head> tag at the top of your current blogger template
<script type="text/javascript">
// paste function here
</script>
then left-click the “monthchunks” link above, copy the javascript, then paste it where it says // paste function here
update your current template’s archive links output. it may look something like this:
 The next idea came to me while I was reading a recent comment on my monthchunks plugin post, which continues to generate interest and thus occasionally new comments. The utility of scrolling down a narrow column of 40 odd comments loses its allure pretty quickly. Wouldn’t it be cool, I thought, if I could hide the old comments without making them inaccessible, in order to bring the most recent to the top, while still sorting them in chronological order.
 With a teensy bit of JavaScript and a little WordPress theme hacking, I wrapped the first bunch of comments in a
  I came back a day or two later and realized that clicking the link to show the hidden comments happens so fast that it’s hard to tell what exactly changed. What a perfect opportunity to try the Yellow Fade Technique, popularized by the folks at 37Signals. [Unfortunately the images on the YFT post are currently broken, so it doesn’t do you much good.] However, the gist is that if you change something subtly on a webpage, you should provide the user with some kind of visual cue that something happened, like fading the updated info from yellow to white.
 Perfect! All I needed was a library that would fade from any color to any background color. Thank you Adam Michela for doing the heavy lifting so I didn’t have to. His Fade Anything Technique does exactly that. I grabbed the code, plugged in my purplish highlight color and my beige background color, so now when you click the link to show the hidden comments, they gradually fade from purple to beige. SO COOL!