These are actually the steps I go through before posting a photo to my blog. I’m always curious how other people edit their photos, so I hope you find this enjoyable and/or informative.
Rotate the image, if necessary. Occasionally my horizons are off ±1.5° (small but noticeable).
Minimally crop out any undesirable peripheral elements, if necessary.
Resize to a minimum width (or height). On my blog most of the photos I publish are only 380 pixels wide. When you have a choice of resizing algorithms, choose cubic or bicubic.
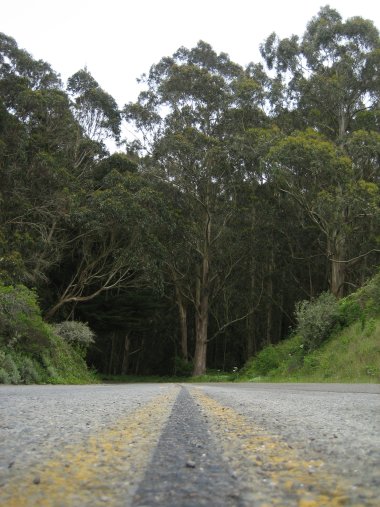
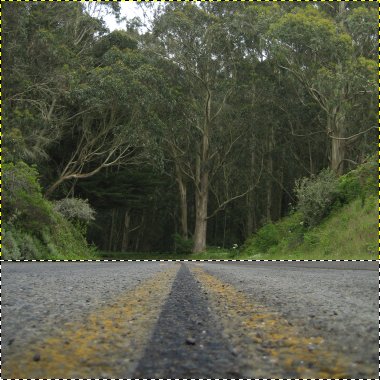
Original photo, resized
Choose an aspect ratio for the photo. The native aspect ratio of most cameras is 4:3. Lately I’ve been playing with square compositions (1:1), but I’m usually a fan of a golden ratio (~1.618:1) for a more panoramic feel. For a widescreen feel, go with 16:9.
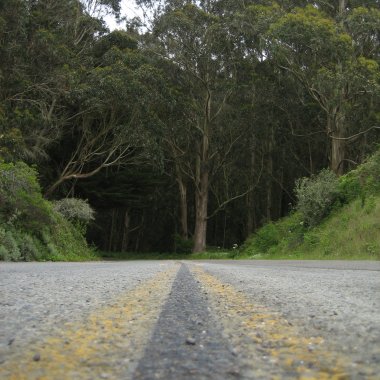
The sky is all whited-out thanks to the fog, so I went with a square ratio to eliminate it
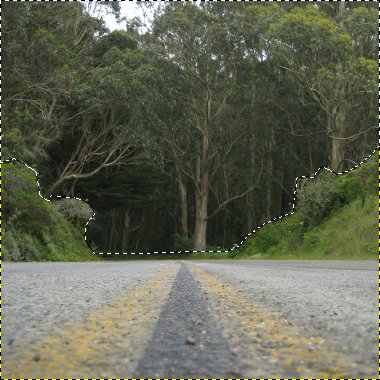
Balance the colors. If any parts of the photo are especially dark (foliage and landscape on a bright day) or light (pavement or sky on a bright day), I selectively choose the area I want to lighten or darken and adjust the color balance (without preserving luminosity).
Select the dark background area with a lasso tool and increase the RGB midtonesDecrease the RGB color levels to darken the pavement
Adjust contrast. I like my photos contrasty, and I find most unedited digital images to be a little gray.
Adjust saturation. I like my photos saturated, especially if they have a variety of colors. Blue skies look bluer, greenery looks greener, yellows and reds look more vibrant.
The yellow paint on the road and the green grass are a little more vibrant
Apply unsharp mask. This is a fancy way to sharpen a photo, essentially increasing the contrast between color boundaries so they look more in focus to the human eye.
Even a slight unsharp mask brings out the texture of the road surface”
Voila, there you have it. The finished product. I did all of the above in The Gimp, a free and open source photo editing tool, similar to Photoshop, but available on Windows, Mac, and Linux. However, all that I’ve described above should be possible with Photoshop or Fireworks. I’m always learning (discovering) new tricks.
Well it had to happen sooner or later. I guess. Someone finally managed to get through my spam defenses. They were really pretty basic. An experiment really. I had:
renamed wp-comments-post.php
html-entity encoded the comment form’s action attribute (the value being my renamed wp-comments-post.php)
added a hidden input field to the form that only got written to the page via JavaScript
updated the renamed wp-comments-post.php to check to make sure that that hidden field had been submitted and had a value
I did all this because I really don’t like captchas (and because I could). I don’t mind requiring JavaScript in order to post a comment. It’s a pretty clever way to prove that a human is sitting at a fully featured web browser submitting the comment because bots don’t usually come with JavaScript parsing engines—the overhead is too great.
The reverse strategy, using a negative captcha (which I haven’t yet employed), involves adding an additional input field directly to the form and then hiding it with CSS. If it gets submitted with any content, you’ve caught yerself a spambot.
The first batch of 90 spam comments that came through (the largest I’d ever received at once) all had the same IP address, so it was easy to blacklist. The second batch all had different IPs (wow, a coordinated attack!) but all the spam linked to hometown.aol.com subsites. Easy block, but one that made me uneasy about the possibility of blocking legitimate content.
Then yesterday morning, the spam was coming in as I was checking my site (all linking to ca.geocities.com sites). Each time I reloaded there was something new. This provided me with the perfect spam laboratory. First, I renamed my already renamed wp-comments-post.php file, re-encoded the new name in HTML entities, and updated the comment form. It had no effect. I tailed my httpd access logs and the spammers instantly started POSTing to the new script. Which means they’re smart enough to regex the page they’re spidering for the form’s action attribute—and decode it.
In order to get past my hidden JavaScript captcha, I can only speculate that their regexes were just liberal enough to gather that they needed to POST something to my very unobfuscated hidden input field within a document.write statement. If I’d had more time, I would have written the full POST array to a database table to get some more insight into what exactly they were sending my way.
So I upped the ante by creating an external JavaScript file, that looks like this:
It gets called and executed after the browser parses my comment form, which creates a new input element in the document’s DOM, sets its type, name, and value attributes, and appends it to the form. I then updated my renamed wp-comments-post.php to check for the hidden field and its expected value.
Back in September I revived my Mini-ITX box to serve as a backup server. I set up BackupPC, ran it once, it seemed to work, and then ignored it for weeks. When I checked back, it hadn’t run successfully since. Ugh, I want backups to just work!
A few nights ago I decided to try again, this time dropping the constraint of not installing software on my laptop. Turns out I already had the building block I needed: rsync, installed in the form of Cygwin.
I began with these Rsync for Windows instructions, and everything went smoothly until the very end—rsync on Windows wasn’t connecting to rsync on Ubuntu. My gut told me rsync’s port 873 isn’t open on Ubuntu, but I had no idea how to open ports anymore. Luckily I found How to start rsync daemon at boot in the Ubuntu forums which told me exactly what I needed to know.
Partly as an aide to my memory, and partly to help anyone out there who might be struggling with the same project (unless everyone except me is already backing up their computers) I decided to summarize the process without all the false starts and dead ends it took me to figure it all out. For more information, the rsync man page is useful, as well as the results in Google for windows rsync.
Set up rsync server on Ubuntu
Run sudo apt-get install rsync (it’s probably already installed)
Create a file named rsyncd.conf in /etc
sudo nano /etc/rsyncd.conf
Add the following to rsyncd.conf, replacing all instances of username with your Ubuntu username:
Add the following to rsyncd.secrets, replacing username with your username and password with a password of your choosing:
username:password
sudo chmod 600 /etc/rsyncd.secrets
Open rsync port by editing /etc/default/rsync and setting
RSYNC_ENABLE=true
Restart rsync
sudo /etc/init.d/rsync restart
Set up rsync client on Windows
Install Cygwin, making sure Editors > nano and Net > rsync are selected
Add C:\cygwin\bin; to the Windows PATH statement
Right-click on My Computer and select Properties
Switch to the Advanced tab and click the Environment Variables button at the bottom
Find the “Path” or “PATH” variable in the System variables list at the bottom and click Edit
Add C:\cygwin\bin; to the beginning of the list
Create secret file to store password in Cygwin
Start Cygwin Bash Shell
Create secret file in the filesystem root and enter only the password in rsyncd.secrets above, with no spaces or line breaks
nano /secret
chmod 600 /secret
chown Administrator:SYSTEM /secret
Create bat file to run rsync
Open Notepad and enter the following command, replacing User Name with your Windows User Name directory, username with your Ubuntu username, and ipaddress with the IP address of your Ubuntu server (e.g. 192.168.0.100):
C:\cygwin\bin\rsync.exe -qrtz --password-file=c:\cygwin\secret --delete "/cygdrive/c/Documents and Settings/User Name" username@ipaddress::usernamebackup
As you may have guessed, the "/cygdrive/c/Documents and Settings/User Name" command line option designates where to start backing up from. As currently configured, this will backup your Windows home directory (Desktop, My Documents, etc). If you want to backup your whole hard drive, change that option to "/cygdrive/c".
Save the file as C:\rsync.bat
Create scheduled task to run C:\rsync.bat once a day
Switch to the Schedule tab and select the time you want the backup to run every day and click Ok
Test the scheduled task
Create a folder called C:\data and put a few photo files in it
Edit C:\rsync.bat and change "/cygdrive/c/Documents and Settings/User Name" to "/cygdrive/c/data"
Add the command pause on a new line at the bottom of C:\rsync.bat and save the file
Right-click on the “rsync backup” scheduled task and select “Run”—A command window should popup and with either errors or the list of files being transfered. If there are errors, troubleshoot them.
Once the scheduled task and C:\rsync.bat appear to be working correctly, change "/cygdrive/c/data" back to "/cygdrive/c/Documents and Settings/User Name" and remove the pause command
Finally, edit the scheduled task properties and change “Run as:” to NT AUTHORITY\SYSTEM—this will ensure that the process runs in the background, without popping up a command prompt window
Run your first backup
Run C:\rsync.bat from the command line before going to bed. Backing up 35GB over a wireless-g connection took me over 8 hours. Subsequent backups take less than a minute. Behold the beauty of rsync.
associate a name with your webspace, e.g. somesubdomain.dreamhosters.com for free or somedomain.com if it’s available (at Dreamhost, one domain name registration is included in your account)
Install WordPress in your webspace
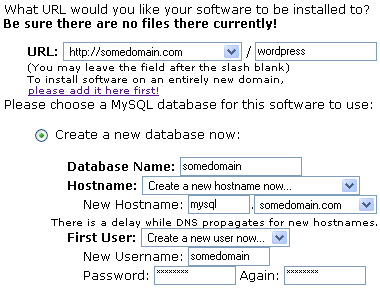
use Dreamhost’s one-click install process (under Goodies > One-Click Installs) to install WordPress in a subdirectory called wordpress (takes care of the tedious database creation and configuration)
(otherwise, follow these instructions to install WordPress manually)
visit http://somedomain.com/wordpress/ and run through WordPress’s simple web-based install process
login with the admin user and change password under Users
create a new user for yourself under Authors & Users
give your new user administrator privileges
choose a theme
follow these instructions for making the homepage of your blog show up at http://somedomain.com/ instead of http://somedomain.com/wordpress/
According to the new Firefox 2 defaults, I am guilty of opening too many tabs. At an average window width of 1024px (though I’m usually browsing at around 1200px) you can only open 10 tabs with the newly enforced tabMinWidth of 100px.
I don’t know about you, but I use tabs as visible history. New thoughts, new searches, new links all get opened up in new tabs. That way they’re always easily accessible for future browsing or reference later. Heavy emphasis on easily.
With Bloglines alone I might skim 60 new posts and open 15-20 at a time to read or comment on further. I’m sure I can’t be alone on this one. Hiding the new tabs makes my active browsing history (and future reading) invisible and less accessible—let alone eliminating the feedback of a successful Ctrl+click.
I don’t believe that people navigate tabs by the first 8-12 characters visible from the page’s title. We navigate primarily based on the favicon and the tab’s location on the tab bar. Tabs on the left are more recent, more frequently used (Gmail, Bloglines, my blog, etc), more important, and tabs on the right are newer, less important, set aside for future browsing. The tab bar represents a browsing timeline.
Solving the problem of too many tabs by conveniently hiding them out of view is no solution at all—especially considering that tabs are traditionally the territory of power users. Hiding them neuters their power. Here’s the thing that gets me: the problem of too many tabs already had a solution: closing tabs!
Once there are too many tabs to keep track of, Ctrl+w is the excessive tabber’s best friend. You’d think that adding a close button to each tab would suffice for the average user.
How to fix this? Type about:config in your Location bar, search for tabMinWidth. Double click on the browser.tabs.tabMinWidth entry and change the value from 100 to 15. At a window width of 1024 you’ll be able to comfortably fit 25 tabs (with only favicons visible), which pretty closely resembles the pre-FF2 behavior.
The Firefox 2 tab bar, before and after tabMinWidth modification


 I did all this because