Animated QR Code Logo
There was a public service announcement I saw on TV in France which had a QR Code permanently displayed next to the chyron. It was amusing to me because the graphic was all white, so when the video behind it was light in color, the QR Code became unintelligible. I snapped a few quick shots as examples.
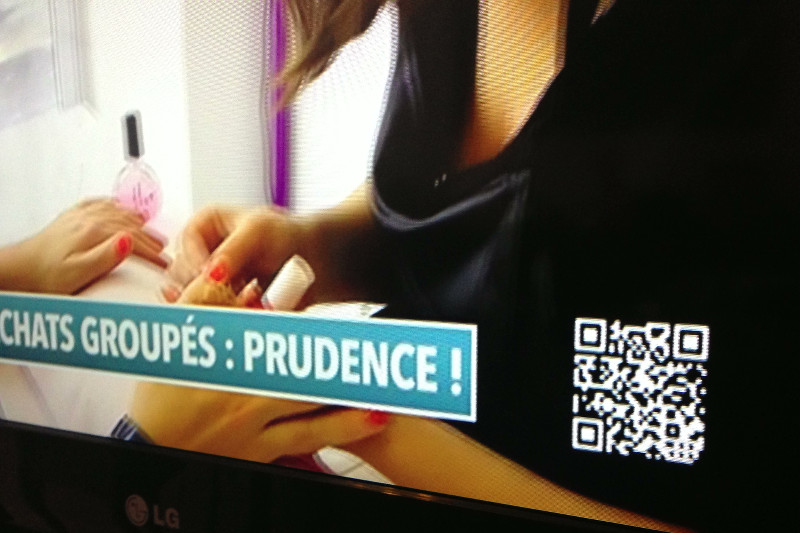

The double irony is that because they inverted the colors of the QR Code, many readers can’t decode it even when the background happens to be dark! (What’s white in the codes above should be black on a white background.) I struggled to get ZXing to decode it until I manually inverted the colors in Gimp. Same with the QR Droid app. And what does it encode, you might be curious to know? A generic Facebook page URL:
http://www.facebook.com/consomag.TV?fref=ts
That would have been the end of my post, but I also took a few shots of the logo for the organization behind the commercial, Conso Mag. I thought the way they incorporated the QR Code as a design element in their logo was pretty creative and novel.
On a whim I spent some time cropping and resizing the photos so I could turn them into an animated GIF. Only later did I check their website and discover that several of the commercials were playing on the homepage. I downloaded one of the videos (which were easily accessible as MP4s) and used ffmpeg to extract 91 frames of the logo animation (@25fps), cropped to 300×300 pixels. The total combined file size of all the images (as PNGs) came to 4.5 megabytes. Using ImageMagick’s convert utility to turn them into an animated GIF (without any optimizations) brought it down to 3.3 megabytes. Not bad as a proof-of-concept, but a little bloated to put on my blog—which gave me a nice puzzle to work on in France whenever I had a little free time.
First I explored the various optimizations that are baked into the convert command. I was able to get the best results with -layers OptimizeTransparency, which brought the file size down to 2.5 megabytes. Reducing the animation to just 16 colors seemed promising, as it shaved off another megabyte, but the resulting animation started to exhibit unattractive dithering in the otherwise solid background. Grrr.
In ImageMagick’s tutorial on optimizing animated GIFs, there were examples of the individual GIF frames after they’d been “optimized”—with transparency in subsequent frames to take advantage of pixels that were unchanged from prior frames. When I looked at the “optimized” frames from the animated GIF I’d created, I discovered why the file size was still so big: the frames contained all sorts of subtle, “blocky” artifacts (as a result of the original MP4 encoding) which were mostly undetectable to the eye, but still had to be accounted for in the animation.
So I spent some time investigating how to reduce the number of colors in each individual frame (as a strategy for eliminating the artifacts) which I hoped would aid ImageMagick’s animated GIF optimizer. I used a program called pngquant (and a shell script for-loop) to reduce each frame to just 4 colors without dithering. Then I recombined the images into an animated GIF, and the file size was now down to a mere 342 kilobytes!
I took a look at the newly optimized frames of the animation and discovered that occasionally the later frames had the entire background filled with color because pngquant had chosen slightly different shades of green when it processed each frame individually. What I really wanted was to reduce the colors in all the frames in the same way. So I turned to yet another ImageMagick utility, montage, (one I hadn’t used before) to stitch all 91 frames into a single PNG, which I then ran pngquant on to reduce the number of colors on all the images in one fell swoop. I used convert to crop them back into individual frames (discovering in the process the importance of the +repage flag to reset the offsets in the individual PNG frames) which I assembled into a single, super-optimized, animated GIF. Final file size: 286 kilobytes, down from 4.5 megabytes. Not too shabby.
Without further ado, here is Conso Mag’s rad logo, rendered as an animated GIF, for your enjoyment:
For posterity/future reference, here are the commands that I clobbered together to convert the source MP4 video into the animated GIF you see above:
wget http://www.conso.net/video/2013/09/933%20site%20achats%20groupes.mp4
ffmpeg -i 933\ site\ achats\ groupes.mp4 -vf "crop=300:300:200:47" -t 4 ffout%03d.png
montage ffout*.png -geometry +0+0 montage.png
pngquant 4 --nofs montage.png
convert montage-or8.png -crop 300x300 +repage parts-%02d.png
# here I manually deleted the blank images from the end of the montage
convert -delay 1x25 -loop 0 -colors 4 -layers OptimizeTransparency parts-*.png conso-mag-logo-animated.gif